
Do you want to know how to check if your variable valve timing solenoid is bad on your car? In this article, I am going to show you how to inspect a variable valve timing solenoid also referred to as a variable valve timing oil control valve, and how to know if it’s bad.
The variable valve timing solenoid sends information to the vehicle’s computer to determine ignition timing and adjust valve lifter operation. This part activates when the vehicle is pulling additional weight, traveling uphill, or when the gas pedal is quickly pushed down.
- Key Takeaway
- What is a Variable Valve Timing Solenoid?
- How To Check If Variable Valve Timing Solenoid Is Bad On Your Car
- 1. Required tools for the job
- 2. Scan your vehicle for error codes
- 3. Locate the variable valve timing solenoid
- 4. Unplug the electrical connection
- 5. Turn the ignition key
- 6. Test the voltage
- 7. Remove the variable valve timing solenoid
- 8. Test the operation using the car battery
- 9. Measure the coil resistance
- 10. Manually check the movement of the VVTS
- Signs of a Bad Variable Valve Timing Solenoid
- What Causes a Variable Valve Timing Solenoid To Go Bad
- How Do You Test a VVT Solenoid?
- Will a bad variable valve timing solenoid cause a misfire?
- FAQs
- Q: What is a variable valve timing solenoid?
- Q: What are the symptoms of a bad variable valve timing solenoid?
- Q: Can a bad variable valve timing solenoid cause the engine to go bad?
- Q: How can I test if my variable valve timing solenoid is faulty?
- Q: How much does it cost to replace a variable valve timing solenoid?
- Q: Can I drive with a bad variable valve timing solenoid?
- Q: What is an oil control valve and how does it relate to a variable valve timing solenoid?
- Q: What are some common symptoms of a bad oil control valve?
- Q: How important is it to check the variable valve timing solenoid?
- Q: Can a faulty variable valve timing solenoid affect fuel economy?
- In Conclusion
Key Takeaway
- A bad variable valve timing solenoid will show error codes P0010, P0011, P0012, P0013, P0014, P0015, P0020, P0021, P0022, P0023, P0024, P0025, P0028, and P1349 when scanned with a diagnostic scanner.
- To check if the Variable Valve Timing (VVT) solenoid is bad on your car, you need to look for signs such as the Check Engine Light coming on, indication of dirty engine oil, experiences of rough engine idle, decreased fuel economy, or a rattling noise, which might necessitate a diagnostic scan for confirmation.
What is a Variable Valve Timing Solenoid?
A Variable Valve Timing (VVT) solenoid, also known as a VVT Actuator or Oil Control Valve (OCV), is an essential component in an internal combustion engine that aids in managing the opening and closing of the intake and exhaust valves.
This system uses advanced algorithms to precisely time when valves open and close, optimizing engine performance across a wide range of RPMs.
The VVT solenoid is responsible for changing the position of the camshafts in the engine. It achieves this by regulating the flow of oil pressure to the camshaft depending on the speed and load of the engine.
By adjusting the timing of valve operations, the VVT system helps to increase fuel efficiency, reduce emissions, and enhance overall engine performance.
How To Check If Variable Valve Timing Solenoid Is Bad On Your Car
The variable valve timing solenoid becomes faulty over time. Sometimes, cleaning can be the solution. However, if the valve is too far gone, you will need to replace it.
In this article, I will provide you with a step-by-step guide on how to check if a variable valve timing solenoid is bad for your car.
1. Required tools for the job

- Gloves
- Safety goggles
- 10mm socket
- Diagnostic tool
- Digital voltmeter
2. Scan your vehicle for error codes

A faulty variable valve timing solenoid can cause a check engine light. To determine that indeed the VVTS is igniting the check engine, you will need to scan your vehicle with a diagnostic scanner.
A variable valve timing solenoid can be faulty due to not receiving the proper voltage, being worn out, being coated with varnish, dirty or low oil in the engine, or even from a dirty clogged variable valve timing solenoid filter screen.
When the variable valve timing solenoid goes bad, a series of error codes such as P0010 P0011 P0012 P0013 P0014 P0015 P0020 P0021 P0022 P0023 P0024 P0025 P0028 P1349 will show during the scanning.
If you do not have a diagnostic scanner, you can order one on amazon.com or take your vehicle to an auto parts store which will normally perform this service for free.
3. Locate the variable valve timing solenoid

The variable valve timing solenoid is usually located at the front of the engine on the pulley side somewhere below the valve cover. The location will depend on the car’s make and model.
4. Unplug the electrical connection
To inspect the operation of the variable valve timing solenoid, you will need to first unplug the electrical connection attached to it. The electrical connection is not secured with any bolts. You just need to pull it out.
5. Turn the ignition key
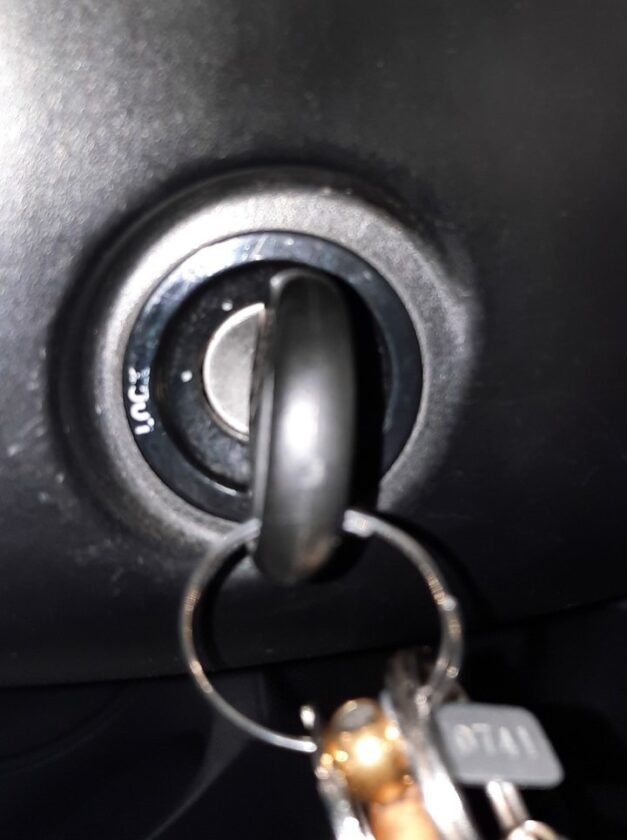
Next, get behind the wheel and turn the ignition key in the ON position without starting the vehicle. You will need to have electrical power running to the variable valve timing solenoid in order to check it.
6. Test the voltage
Take a digital voltmeter and set it to DC volts. Touch the two test leads to the two electrical connections. You can order a digital voltmeter on amazon.com. If there is no voltage during the testing, you will need to check for shorts and the wiring.
However, if there is a reading, that means that your variable valve timing solenoid is getting electrical power and you can move to the next step.
7. Remove the variable valve timing solenoid

You will need to remove the variable valve timing solenoid to further inspect its operation. It is usually held by one 10mm bolt. Once the bolt is removed, you can remove the VVTS by twisting it back and forth as you pull it straight out with your hand.
8. Test the operation using the car battery
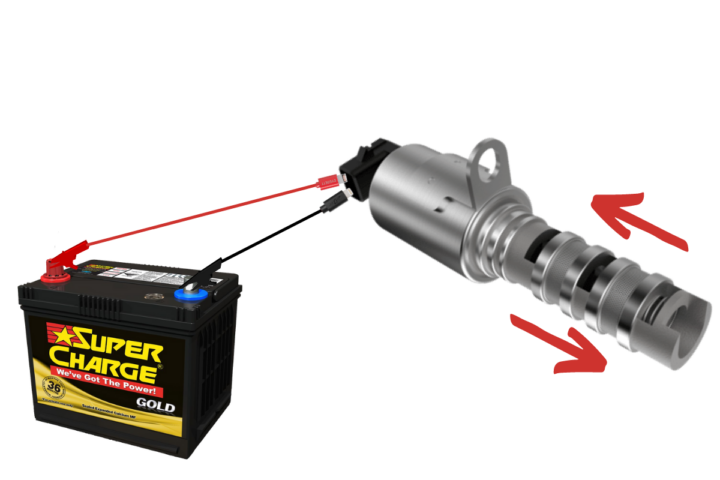
Next, we’re going to use the battery on the vehicle to test the variable valve timing solenoid.
Take two alligator clip test leads and attach them to the two electrical connections on the variable valve timing solenoid. Then, take the other ends of the alligator clips attach one to the negative battery connection, and touch and release the other one on the positive battery connection.
At this point, the variable valve timing solenoid should move freely back and forth. If it does not move back and forth freely then it might need to be replaced. However, if your VVTS is operating, move on to the next step.
9. Measure the coil resistance
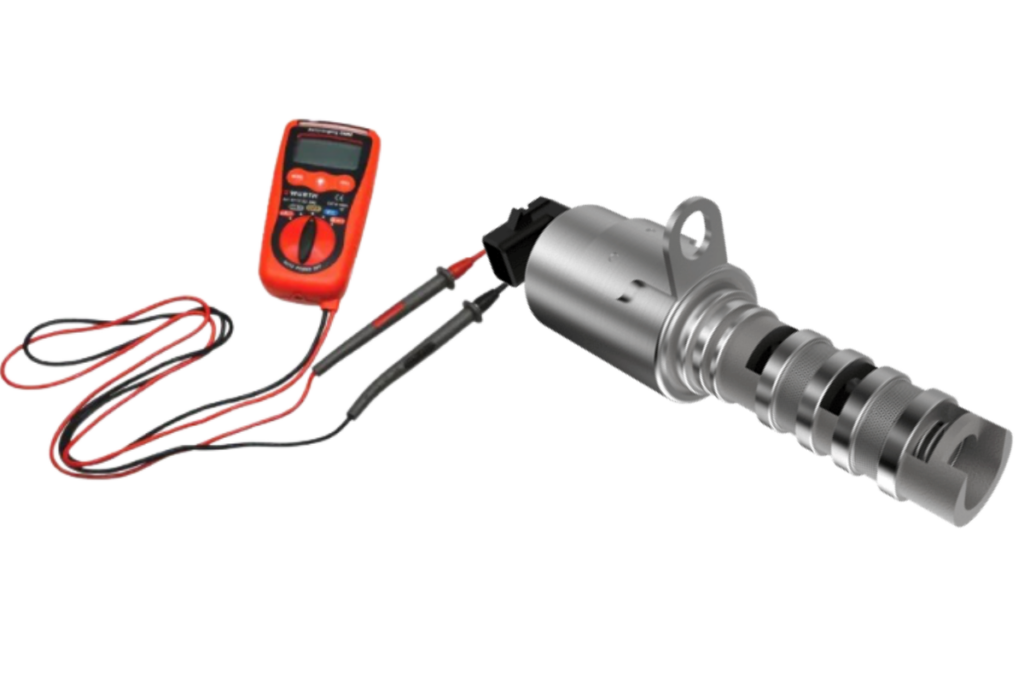
To measure the coil resistance of your variable valve timing solenoid, you need to set your digital voltmeter on the 200 ohms setting and place your two probes on the two electrical connections.
In the owner’s manual, you will find the ohms range for your coil. If the reading is not within the acceptable range, you will need to replace the variable valve timing solenoid.
10. Manually check the movement of the VVTS
In the last step, you will need to check the variable valve timing solenoid manually. Just grab something like a knife and try to move the valve. Make sure that it feels smooth back and forth.
If the valve is heavily coated with varnish from not changing your oil regularly, then you can soak the front end of the valve in a cleaner. If the valve is still not moving freely after being clear, you will need to replace it says Cars From Japan.
Signs of a Bad Variable Valve Timing Solenoid
- Check Engine Light coming on
- Dirty engine oil
- Rough engine idle
- Decreased fuel economy
- Rattling noise from the engine
- Poor engine performance
- Misfiring engine underloads
- RPM fluctuation
What Causes a Variable Valve Timing Solenoid To Go Bad
- Dirty engine oil
- Lack of regular oil changes
- Poor quality oil used in the engine
- Damage from heat and wear over time
- Electrical faults or wiring issues
- Clogged oil passages
- Mechanical failures within the engine
How Do You Test a VVT Solenoid?
- Disconnect the battery: Ensure your vehicle is off and disconnected from the power source for safety.
- Locate the VVT solenoid: Refer to your car’s manual to find the location of the Variable Valve Timing (VVT) solenoid.
- Disconnect the solenoid: Unplug the electrical connection from the solenoid.
- Check for resistance: Using a multimeter, check for resistance in the solenoid. The expected resistance value can typically be found in your vehicle’s service manual.
- Compare the readings: If the resistance is outside the values stated in the manual, it could indicate a bad solenoid.
- Inspect for physical damage: Look for any visible signs of damage or wear on the solenoid.
- Clean and reinstall if undamaged: If no damage is found and resistance is within acceptable range, clean the solenoid and reinstall it.
- Test drive the vehicle: If the symptoms persist after cleaning and reinstalling, consider replacing the VVT solenoid.
Will a bad variable valve timing solenoid cause a misfire?
A faulty variable valve timing solenoid will cause the engine to misfire or appear to stumble when the vehicle is loaded with extra weight, climbing hills, or when you apply quick pressure to the gas pedal for instant acceleration. This is often caused by an electrical issue with the switch and not always the switch itself.
FAQs
Q: What is a variable valve timing solenoid?
A: A variable valve timing solenoid is a component of the variable valve timing (VVT) system in an engine. It is responsible for controlling the flow of oil to the VVT mechanism, which adjusts the timing of the engine’s intake and exhaust valves.
Q: What are the symptoms of a bad variable valve timing solenoid?
A: Some common symptoms of a bad variable valve timing solenoid include rough idling, poor engine performance, decreased fuel economy, and a check engine light. It can also cause issues with the engine’s timing system and oil pressure.
Q: Can a bad variable valve timing solenoid cause the engine to go bad?
A: While a bad variable valve timing solenoid can cause performance issues and potentially lead to further damage if not addressed, it is unlikely to cause the engine to completely fail on its own. However, it is important to address the issue as soon as possible to prevent further problems.
Q: How can I test if my variable valve timing solenoid is faulty?
A: Testing a variable valve timing solenoid usually requires specialized tools and knowledge. It is best to consult a professional mechanic who can perform diagnostic tests and determine if the solenoid is functioning properly.
Q: How much does it cost to replace a variable valve timing solenoid?
A: The cost of replacing a variable valve timing solenoid can vary depending on the make and model of your car and the labor rates of the repair shop. On average, the cost can range from $200 to $500.
Q: Can I drive with a bad variable valve timing solenoid?
A: It is not recommended to drive with a bad variable valve timing solenoid for an extended period of time. The engine may experience poor performance, decreased fuel efficiency, and potential damage to other components. It is best to have it repaired as soon as possible.
Q: What is an oil control valve and how does it relate to a variable valve timing solenoid?
A: An oil control valve is a component that controls the flow of oil to the variable valve timing mechanism. It works in conjunction with the variable valve timing solenoid to adjust the timing of the engine’s intake and exhaust valves.
Q: What are some common symptoms of a bad oil control valve?
A: Common symptoms of a bad oil control valve include rough idling, decreased engine performance, and a check engine light. It can also cause issues with the engine’s timing system and oil pressure.
Q: How important is it to check the variable valve timing solenoid?
A: Checking the variable valve timing solenoid is important as it is a crucial component of the VVT system. If the solenoid is not functioning properly, it can affect the engine’s performance, fuel economy, and overall reliability.
Q: Can a faulty variable valve timing solenoid affect fuel economy?
A: Yes, a faulty variable valve timing solenoid can negatively impact fuel economy. The VVT system helps optimize the engine’s performance and efficiency by adjusting the timing of the intake and exhaust valves. If the solenoid is not functioning properly, it can result in decreased fuel economy.
In Conclusion
A variable valve timing solenoid is an important part of the engine. If you suspect that your VVT solenoid has gone bad, you can follow the steps above and diagnose the condition of the part.
Before replacing your VVT solenoid, I suggest that you first try and clean it. If you are still experiencing some issues even after the cleaning, it is time to replace your VVT solenoid.