
A leaking tire valve is a very commonly overlooked area in a leaking tire. The Schrader tire valve can form a leak with age, either from dirt or having a damaged seal.
Sometimes, the tire valve can even be faulty from new. I have had this issue in the past and I have successfully replaced my tire valve with a new one.
So, if your tire is leaking air and you suspect that it is the tire valve, or you don’t know what is causing your tire to leak air, read along. I will be showing you how to find and fix a leaking tire valve.
Key Takeaway
- A tire valve is a small, often overlooked component that allows you to inflate or deflate your tires, and it’s crucial because it maintains the correct tire pressure, contributing to safe driving, fuel efficiency, and the overall lifespan of your tires.
- To find and fix a leaking tire valve, apply soapy water to the valve stem and look for bubbles indicating a leak, then tighten or replace the stem as needed, followed by re-inflating the tire to the correct pressure.
What Is a Tire Valve And Why Is It Important?
A tire valve is a small, typically metal component located on the wheel rim that provides an access point to the inside of your tire.
It’s crucial for two main reasons: inflation and pressure checks. The valve allows for air to be pumped into the tire, inflating it to the appropriate pressure level for safe and efficient driving.
It also allows for the measurement of the tire’s internal pressure with a pressure gauge.
Having the correct tire pressure is important because it affects the vehicle’s handling, fuel efficiency, tire lifespan, and overall safety.
Therefore, a functioning tire valve is essential in maintaining the health and performance of your tires.
How to Find and Fix a Leaking Tire Valve
Here is how to find and fix a leaking tire valve:
1. Gather the needed materials

- Schrader valve tool. To remove the tire valve, you will need a valve removal tool. I have used this remover tool that I bought from amazon.com and I’m extremely impressed with its versatility.
- Tire valve stems. If the tests show that your tire valve is leaking air, you will have to replace it. I usually order the valve stem from amazon.com.
- Soapy water. We will be using simple soapy water to test the tire valve for leaks before we replace it.
2. Remove the valve cap
Removing the valve cap is the first step. Valve caps are important as they protect the valve and keeps any dirt out which may shorten its life or cause any issues. Some wheels have a metal cap, however, plastic caps are the most common.
Be careful with metal-style caps. I’ve had issues in the past where they’ll corrode and seize onto the valve stem.
3. Apply soapy water to the valve
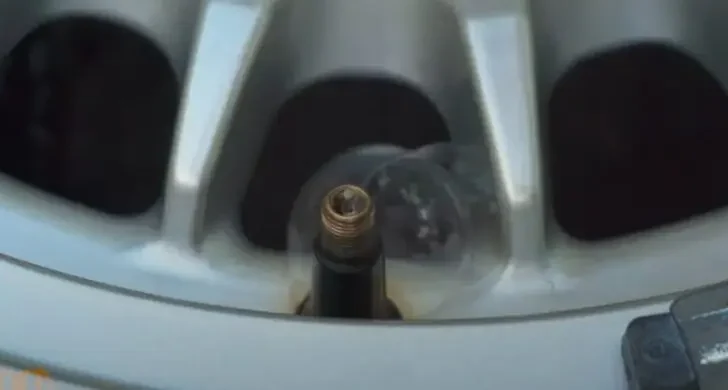
The tire pressure must be present. Meaning, that even if your tire is leaking air, you have to inflate the tire. Then, using a spray bottle or a bottle with a soap and water mixture pour it on top of the valve. This mixture can be dish soap, hand soap, or car wash soap. Something that allows for bubbling.
If the valve is leaking, you’ll automatically see bubbling as shown in the image above. Sometimes only tightening the valve is required as it might get loose over time. But if that doesn’t fix the problem, continue with the following steps.
4. Remove the faulty valve stem

If simply tightening the valve stem didn’t work, it’s time to replace it. Align the tool bit and you’ll feel it clip into place. Then, turn counterclockwise to remove it. Once removed, pull out the valve stem with your fingers, or if air pressure is still present in the tire it will push it out on its own.
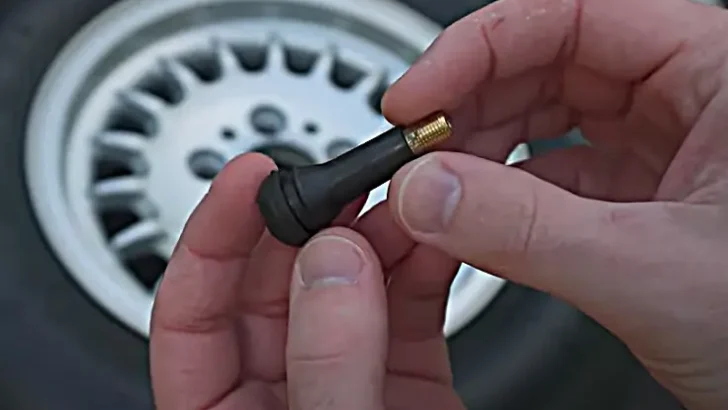
5. Install the new valve stem
You can purchase replacements on their own, or just get a new valve stem and swap over the internal component. What I usually do if I am taking a wheel in to get a tire replaced. The shop will install new valve stems as the rubber can dry out and crack with age, so I remove the valve and keep it as a spare.
Take the new valve and drop it into the casing. Be mindful not to over-tighten it because it is not needed. You may just cause damage to the new valve stem.
6. Inflate the tire to the correct PSI and check for leaks

You are near the end of the tire valve replacement job. Now, all you have to do is inflate the tire to the manufacturer-recommended PSI. That information will be written on the tire.
After you’ve done that, it is time to check the valve with soapy water to confirm that you have no leaks. I would also recommend rinsing off the soap and water mixture just with water to ensure you don’t leave any staining on your wheels.
Before reinstalling the cap, give the valve a flick to remove any water, and then install the cap. Some valve stem removal tools have a pointed portion that is used to clean the stem from debris. Any debris inside may cause issues where the tire won’t pump up properly says WikiHow.
Tire Valve Assembly
1. The valve casing
The Schrader valve casing can be rubber or solid but the valve inside is the same. The only difference with a valve is the temperature rating which would be used in a commercial application such as something with a heavy load and extensive drivIng.
On the image above I have the most common form found on vehicles. The casing is installed from the inside when the bead of the tire is broken or the tire has been removed and is pulled outwards. The groove on the bottom is what clips into place either on the aluminum or steel wheels.
2. The tire valve
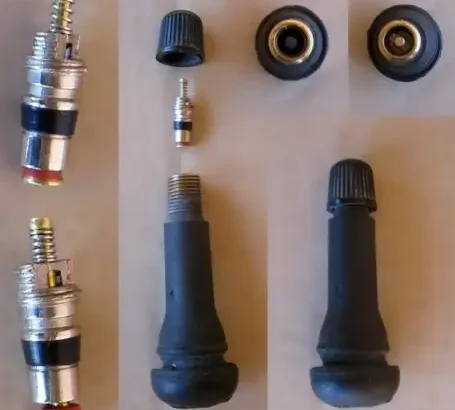
The red ring on the outside is the outer seal that goes against the casing. The threaded portion moves towards the top. The center spring-loaded portion is the valve. When the air chuck is put into place, it’ll push on the center portion allowing air.
On the bottom of the center portion that faces the inside of the tire, there is another seal on this surface too. As for the outer casing, this is just a shell to hold the valve. It’s hollow in the center and there is a threaded portion on the inner-outer side for the valve.
Signs Of a Leaking Tire Valve
- Rapid or slow loss of tire pressure.
- The tire constantly goes flat despite proper inflation.
- A hissing sound coming from the valve area.
- Presence of cracks or physical damage on the valve stem.
- Difficulty in adding air to the tire.
- Signs of moisture or wetness around the valve stem (in case of a slow leak).
- The tire pressure warning light is illuminated on your dashboard.
Can You Patch a Tire Valve?
While it is technically possible to patch a tire valve, the general practice is to replace it entirely rather than attempting to repair it.
This is because tire valves are relatively inexpensive components, and replacing them ensures a proper seal and reliable performance.
Patching a valve may not provide a long-term solution and could potentially lead to further issues down the line.
Therefore, if you suspect your tire valve is damaged or leaking, it’s best to have it inspected and replaced by a professional.
How Can You Tell If Your Valve System Needs Tightening?
- Consistent loss of tire pressure over time.
- The tire repeatedly goes flat despite being properly inflated.
- A faint hissing sound from the valve when the tire is inflated.
- Difficulty inflating the tire because air seems to escape as quickly as it’s pumped in.
- Visible damage to the valve stem.
What Is The Proper Tightness For a Valve Stem?
The proper tightness for a valve stem is typically between 2 and 5-inch pounds.
This specification ensures that the stem is secure enough to prevent air leaks, yet not overly tightened to cause damage.
It’s crucial not to overtighten the valve stem as it can lead to potential damage to the valve, causing leaks or making it difficult to add or release air.
If you are uncertain, always refer to your vehicle owner’s manual for specific instructions. Remember that a snug fit that doesn’t allow for air escape is what you’re aiming for.
FAQs
Q: Can I fix a leaking tire valve myself?
A: Yes, you can fix a leaking tire valve yourself in some cases. It depends on the extent of the damage and your level of expertise. Some leaks can be fixed temporarily using valve sealants or by tightening the valve core. However, if the valve stem is damaged or the leak persists, it is recommended to replace the valve stem or seek professional assistance.
Q: What are some temporary fixes for a leaking tire valve?
A: If you need a temporary fix for a leaking tire valve, you can try using a valve sealant. These sealants can be injected into the valve to temporarily stop the leak. However, it is important to note that a temporary fix should not replace a permanent solution, and the valve should be inspected and repaired or replaced as soon as possible.
Q: How do I replace a leaking tire valve stem?
A: To replace a leaking tire valve stem, you will need to remove the tire from the wheel and then use a valve stem removal tool to remove the old valve stem. Once the old valve stem is removed, you can install a new valve stem by inserting it into the valve hole and tightening it securely. Finally, reattach the tire to the wheel and inflate it to the recommended pressure.
Q: Can a leaking tire valve be repaired or does it always need to be replaced?
A: In some cases, a leaking tire valve can be repaired by tightening the valve core or using a valve sealant. However, if the valve stem is damaged or the leak persists, it is recommended to replace the valve stem. Repairing a leaking valve stem is often a temporary solution and may not provide a long-term fix.
Q: How do I diagnose a slow tire leak?
A: To diagnose a slow tire leak, you can visually inspect the tire for any visible punctures or damage. You can also listen for any hissing sounds near the valve stem or use soapy water to check for air bubbles when the tire is inflated. If you suspect a slow leak, it is important to have it repaired or replaced as soon as possible to avoid further tire damage or safety hazards.
Q: How often should I check my tire valve for leaks?
A: It is recommended to regularly check your tire valves for leaks as part of your routine tire maintenance. Checking the tire pressure and visually inspecting the valves every month or before long trips can help identify any potential leaks early on.
Q: What can I do to prevent tire valve leaks?
A: To prevent tire valve leaks, it is important to maintain the recommended tire pressure, avoid overinflating the tires, and ensure the valve caps are properly secured. Additionally, avoiding harsh impacts or hitting curbs can help prevent valve stem damage.
Q: Can I drive with a leaking tire valve?
A: It is not recommended to drive with a leaking tire valve as it can lead to reduced tire pressure, compromised handling, and potential tire damage. It is important to address any tire valve leaks promptly to maintain optimal tire performance and safety.
In Conclusion
A leaking tire valve can be a very dangerous situation, especially while driving on the road or in any other traffic environment.
It is important to stay safe and fix your leaking tire valve as soon as possible.